
Mastering Keyframe Animation for Dynamic Social Posts in CapCut PC
It's hard to make social media posts that are appealing and catch attention. Animation enhances social media posts and intuitively tells stories.
With keyframe animation, the CapCut desktop video editor can add smooth and professional motion to your videos. It lets you manipulate elements of your frame by frame by moving, scaling, or rotating them.
Keep in mind that CapCut PC is not entirely free; some of the keyframe features and other expert tools need to be paid for access. Using these tools can make your posts look fresh and gain more views.

Why Use Keyframe Animation for Social Posts?
Animation makes social media posts more thrilling and interesting. Action shots capture attention faster than still photos. Motion-enabled posts are viewed longer and liked, shared, or commented on more.
CapCut PC's keyframe animation lets you control how objects in your video move, expand, turn, or fade away. You can set exact points in time to change these effects, and your videos stand out and look seamless.
It is apt for most social posts. You can get text to appear or move, show products with zoom or spin, and transition between scenes smoothly.
With CapCut desktop video editor, you have the freedom of customizing these animations to suit your taste. You can change timing and style to fit your brand or message.
In addition to animation, CapCut PC also comes with text to speech. The functionality incorporates voiceover into your videos, making your animated posts more engaging with clear audio correlated to the animations.
All these features combined assist you in creating special and engaging social media content.
Key Benefits of Keyframe Animation on CapCut PC
Keyframe animation within the CapCut PC video editor gives you total control over the movement and timing of all your content in your video. In other words, you can have smooth professional animations by defining points where things change.
You don't have to be a pro to make complex motion graphics since it is simple with CapCut PC to insert effects such as rotating, scaling, or moving clips.
This app also enables you to better tell your brand story. You can animate logos, include calls-to-action, or add personalized effects that make your content stick.
CapCut desktop video editor allows you to save and reuse templates so that your social posts appear uniform and are more likely to stick.
Plus, CapCut PC AI video generator features include support for converting your idea into videos. After generating videos, you can add keyframe animation to enable you to produce innovative social media content more easily and quickly.
This pairing saves time as well as gives your videos a professional and creative touch.
Step-by-Step Guide to Using Keyframe Animation in CapCut Desktop Video Editor
Step 1: Install CapCut Desktop Video Editor
To begin, launch your web browser and navigate to the CapCut official website. Search for the download button that says "Download for Windows" or "Download for Mac," depending on your operating system.
Click to initiate the download of the CapCut PC installer. When the download is complete, locate the installer file in the downloads folder.
Double-click to install and follow the instructions to install the CapCut desktop video editor. The installation program will walk you through accepting the terms and choosing an installation location.
Once installed, start CapCut PC from your start menu or desktop. Keep in mind that CapCut PC has a free version, but some of its more sophisticated features, such as some of its keyframe tools, are pay-only.
Step 2: Import Your Media
When you open CapCut desktop video editor, press the "Create Project" icon on the home screen.
Next, press the "Import" button or simply drag and drop your video clips, images, or audio files to the timeline section. This will add your media to the project and prepare them for modification.

Step 3: Add Keyframes to Animate Elements
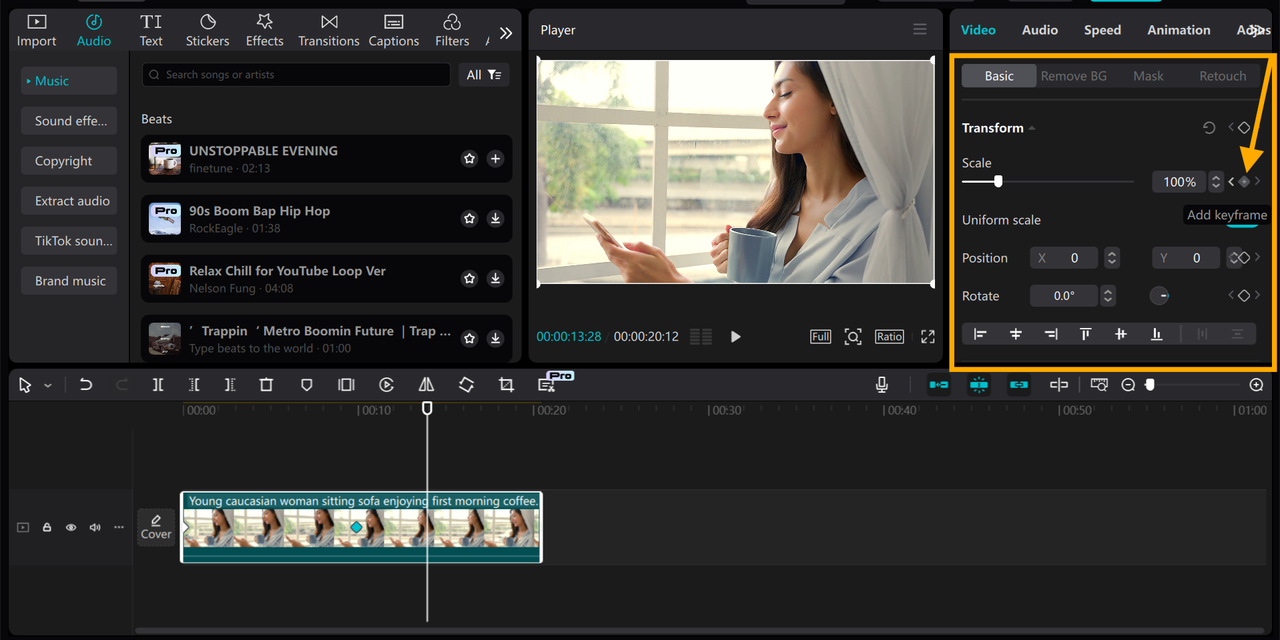
Choose the clip or object that you want to animate in the timeline. Next, find the keyframe symbol (a small diamond) in the editing panel on the right-hand side.
Click the diamond to add your first keyframe at the location of the playhead. Move the playhead to another point in time, and adjust the position, scale, rotation, or opacity of the clip.
CapCut PC will add another keyframe by default. Keep doing this to get smooth motion or effects. For organic animation, attempt to change the timing between major keyframes or apply easing options if the software supports it.
Step 4: Preview and Refine Animation
Press the play icon to preview your animation. Observe how the clip moves or transitions. If a thing seems unnatural, press any keyframe in the timeline to delete or reposition it.
Fine-tune the settings until the animation is smooth and suitable for your style. You can even use CapCut PC's voice changer feature to add professional or comic audio effects to introduce a more interesting post.

Step 5: Share and Export Your Dynamic Social Post
When you are happy with your animation, go to the top right and select "Export". Select the resolution, frame rate, and format that best fit your social media platform, i.e., Instagram or TikTok. Once again, select "Export" to save the video onto your device.

Conclusion
Mastering keyframe animation using CapCut PC has many ways of adding more life and energy to your social media posts.
With the keyframe feature of CapCut desktop video editor, you can insert neat, unique movement that grabs attention.
Keep in mind that while CapCut PC has a lot of free features, some of the advanced features are paid.
Begin using CapCut PC immediately and animate social posts into action that stand out and reach your audience.